Firewall Overview
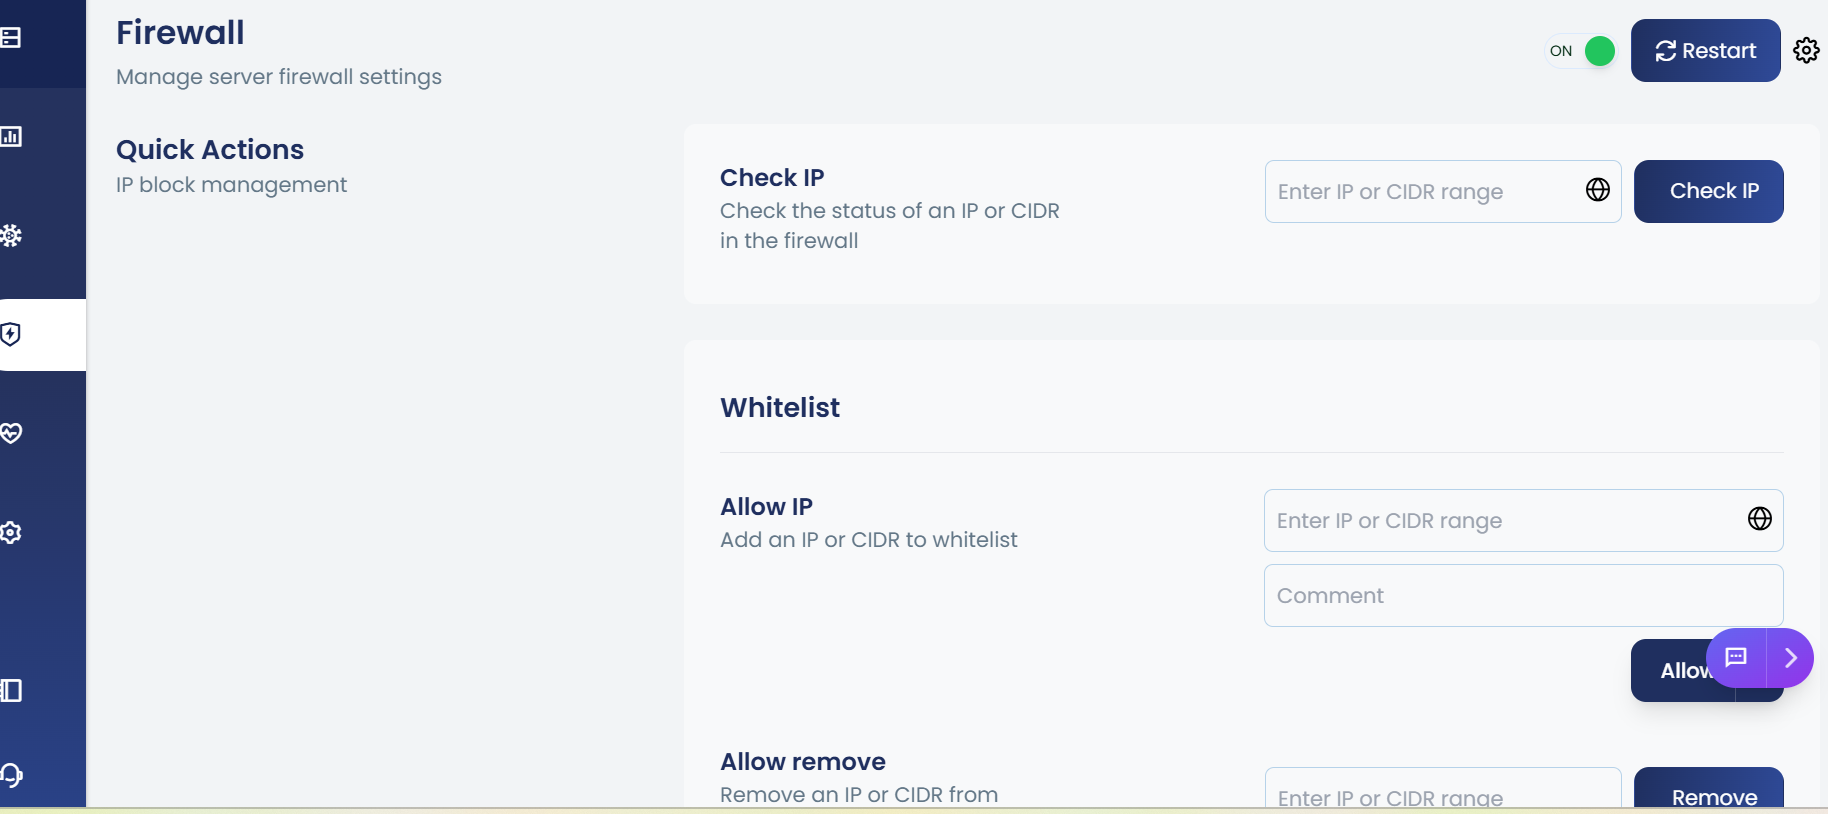
The cPGuard Firewall is a high-performance, system-level security layer designed to block malicious traffic before it reaches your applications. It inspects and filters both IPv4 and IPv6 traffic using unified rulesets, providing robust protection for your server environment.
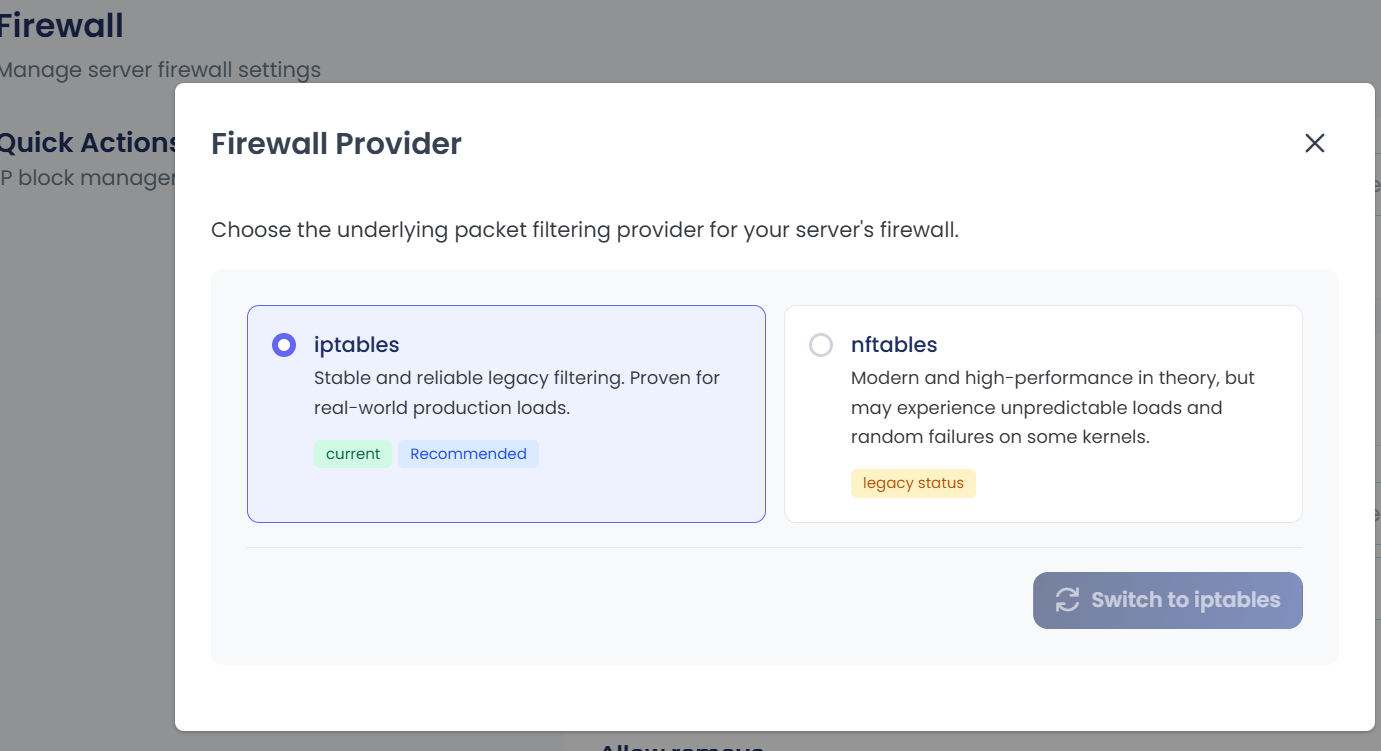
cPGuard supports two underlying packet filtering providers — iptables and nftables — giving you the flexibility to choose the best option based on your server's kernel and workload requirements.
The firewall acts as a central hub for several security sub-modules:
Access the Firewall:
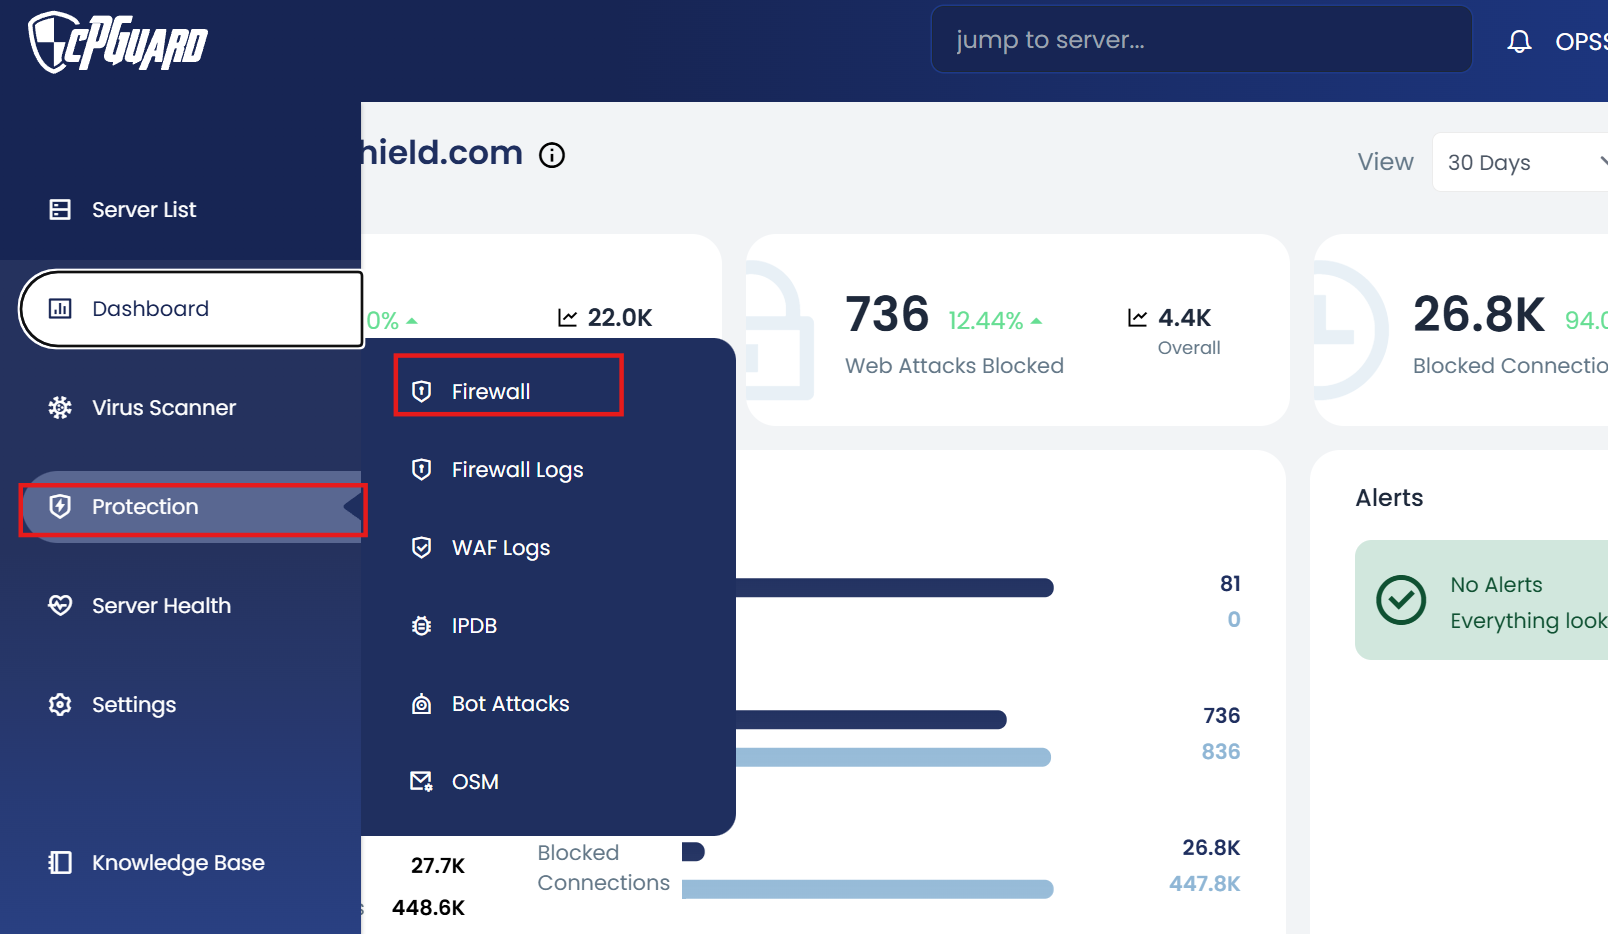
App Portal → Open Server → Protection → Firewall
Firewall Providers
iptables — Recommended
iptables is the stable and reliable legacy filtering provider, proven for real-world production loads. It is the recommended default for most environments due to its consistency and broad kernel compatibility.
nftables — Legacy Status
nftables is a modern, high-performance packet filtering framework. While it offers improved efficiency in theory, it may experience unpredictable loads and random failures on some kernels. It is currently marked as legacy status in cPGuard.
Unless you have a specific reason to use nftables, it is recommended to use iptables for a stable and reliable firewall experience.
How to Switch the Firewall Provider
Using the cPGuard Portal
- Log in to the cPGuard App Portal
- Navigate to the Firewall page
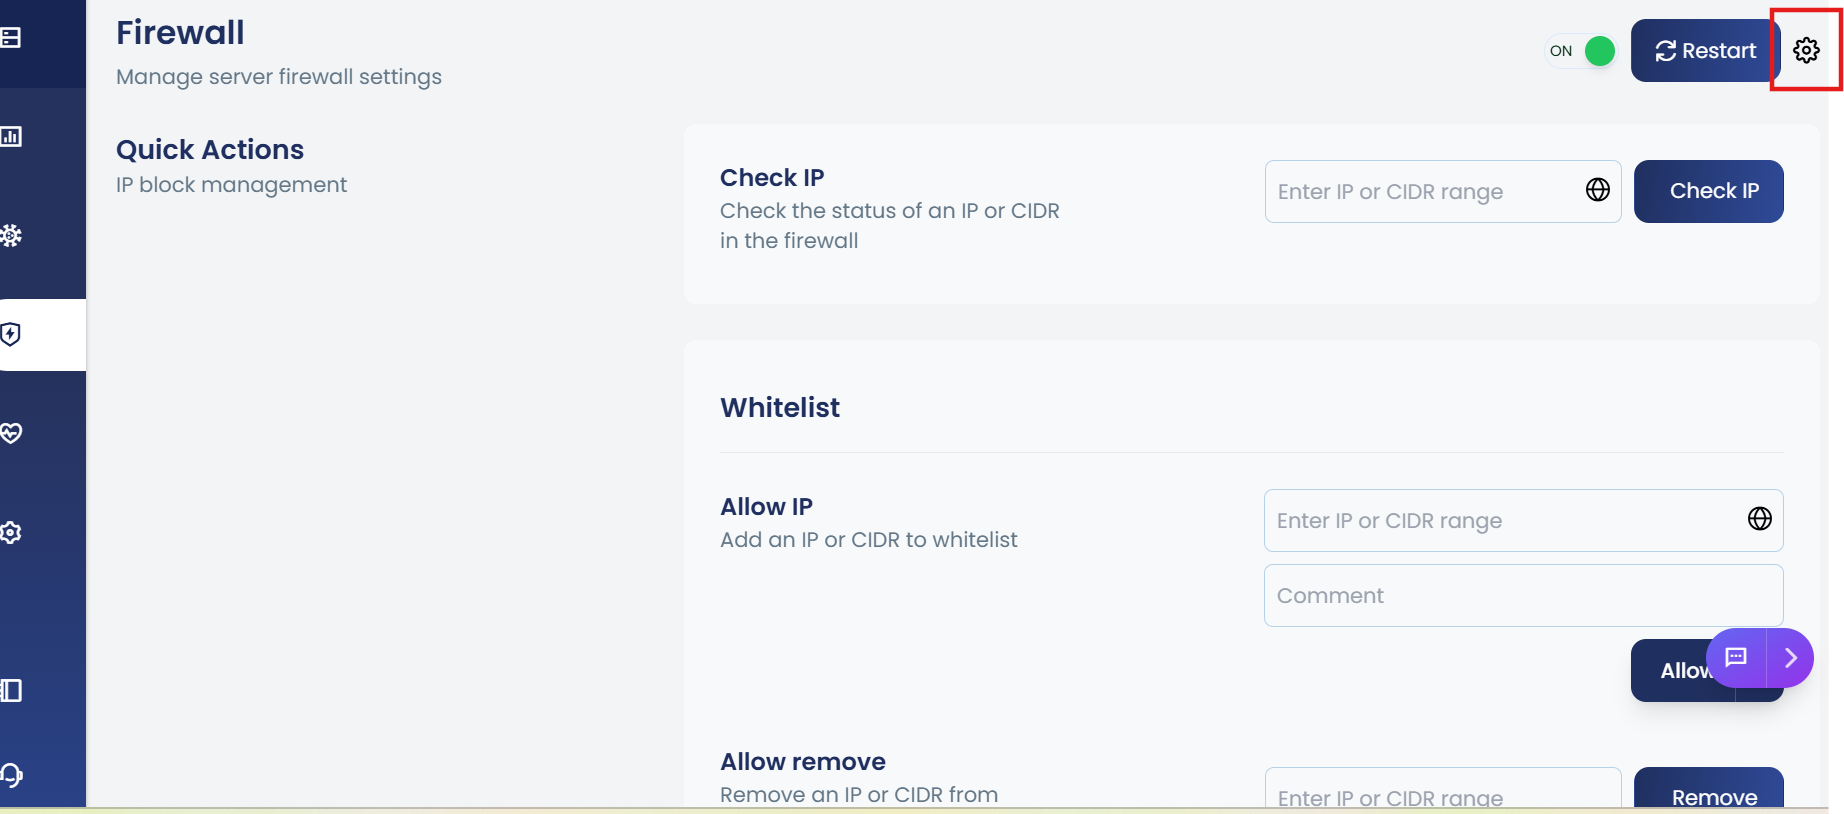
- Click the Settings button located near the Restart button
- The currently enabled provider (iptables or nftables) will be displayed
- Select the required provider and save the changes
Using the CLI
You can check the currently active firewall provider using the following command:
cpgcli fw --provider
This will display the currently enabled packet filtering provider on your server.
If you are unsure which provider to use, stick with iptables for a stable and proven experience. Contact our support team if you need guidance on choosing the right provider for your environment.
Integrated Security Modules:
- IPDB Integration: Proactive blocking based on global threat intelligence. IPs flagged by the IPDB are automatically denied at the firewall level.
- DoS & Bot Protection: Safeguards against connection floods and aggressive AI scrapers by enforcing rate limits and behavioral analysis.
- Port Filtering: Granular control over inbound and outbound TCP/UDP traffic. Define exactly which ports are accessible to prevent unauthorized service exposure.
Quick Actions: Checking an IP
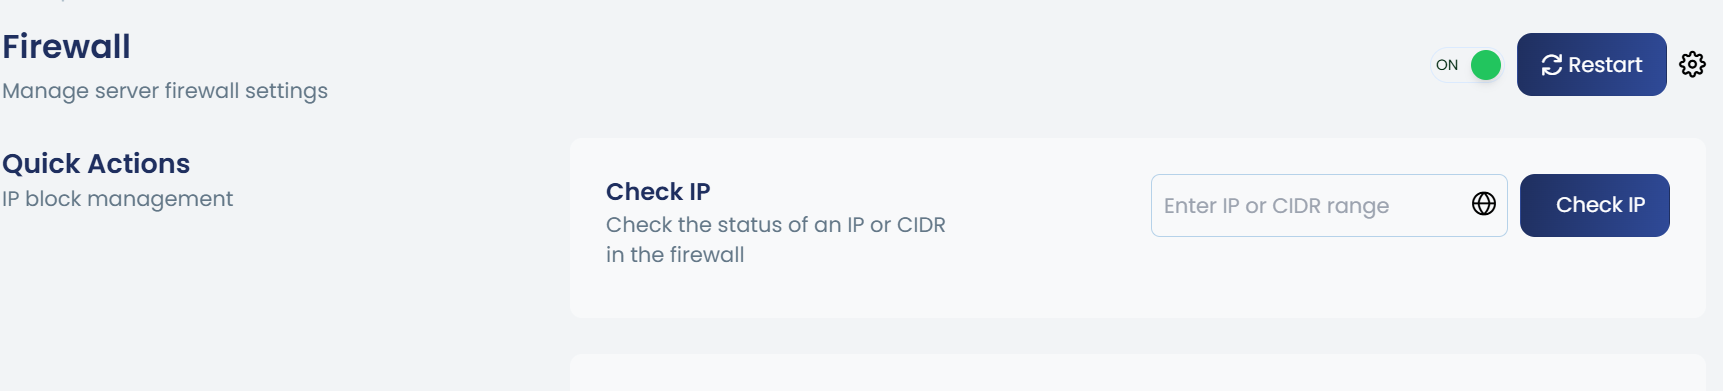
The Check IP tool allows you to instantly verify the status of an address within the firewall. Use this to determine if an IP is currently blocked, allowed, or flagged by any security module.
Via App Portal:
Use the "Check IP" input at the top of the Firewall configuration page. The result displays the IP status, source of the block (if any), and expiry time for temporary bans.
Via CLI:
cpgcli ip --check <IP_Address>
This command returns the current firewall status and active rules affecting the specified IP.
Service Management
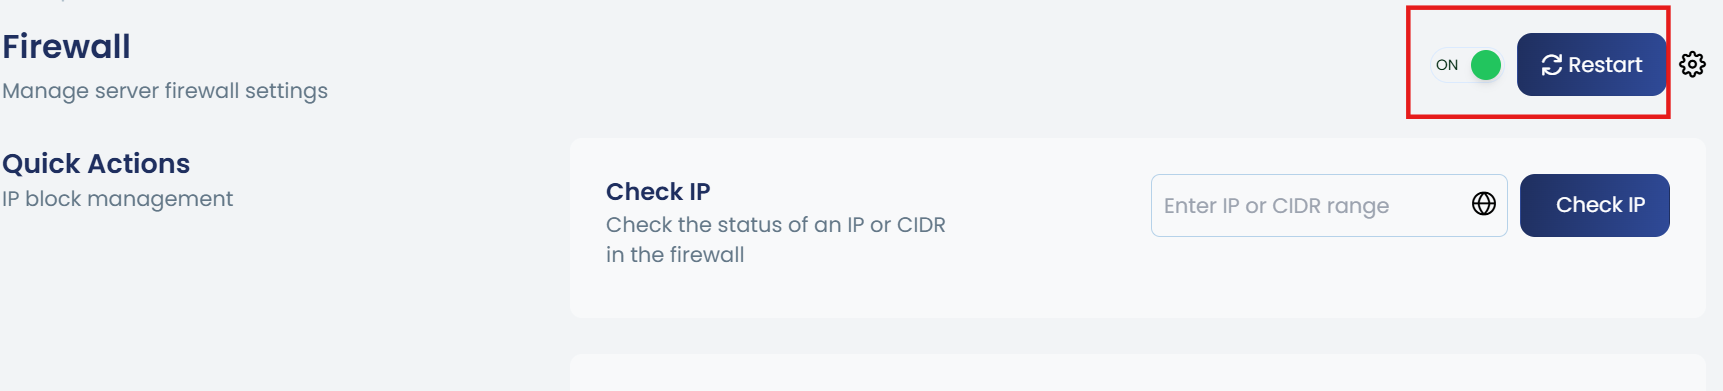
You can toggle the entire firewall module using the master switch in the App Portal or via CLI. Disabling the firewall removes all active rules but preserves your configuration for future use.
Enable Firewall:
cpgcli fw --enable
Disable Firewall:
cpgcli fw --disable
Restart:
cpgcli fw --restart
Start firewall with extended logging ( recommended for debugging only )
cpgcli fw -- debug
For details on managing Whitelisted and Blacklisted IPs in the cPGuard Firewall, refer to the dedicated documentation: Whitelist and Blacklist Action.
Temporary Ban
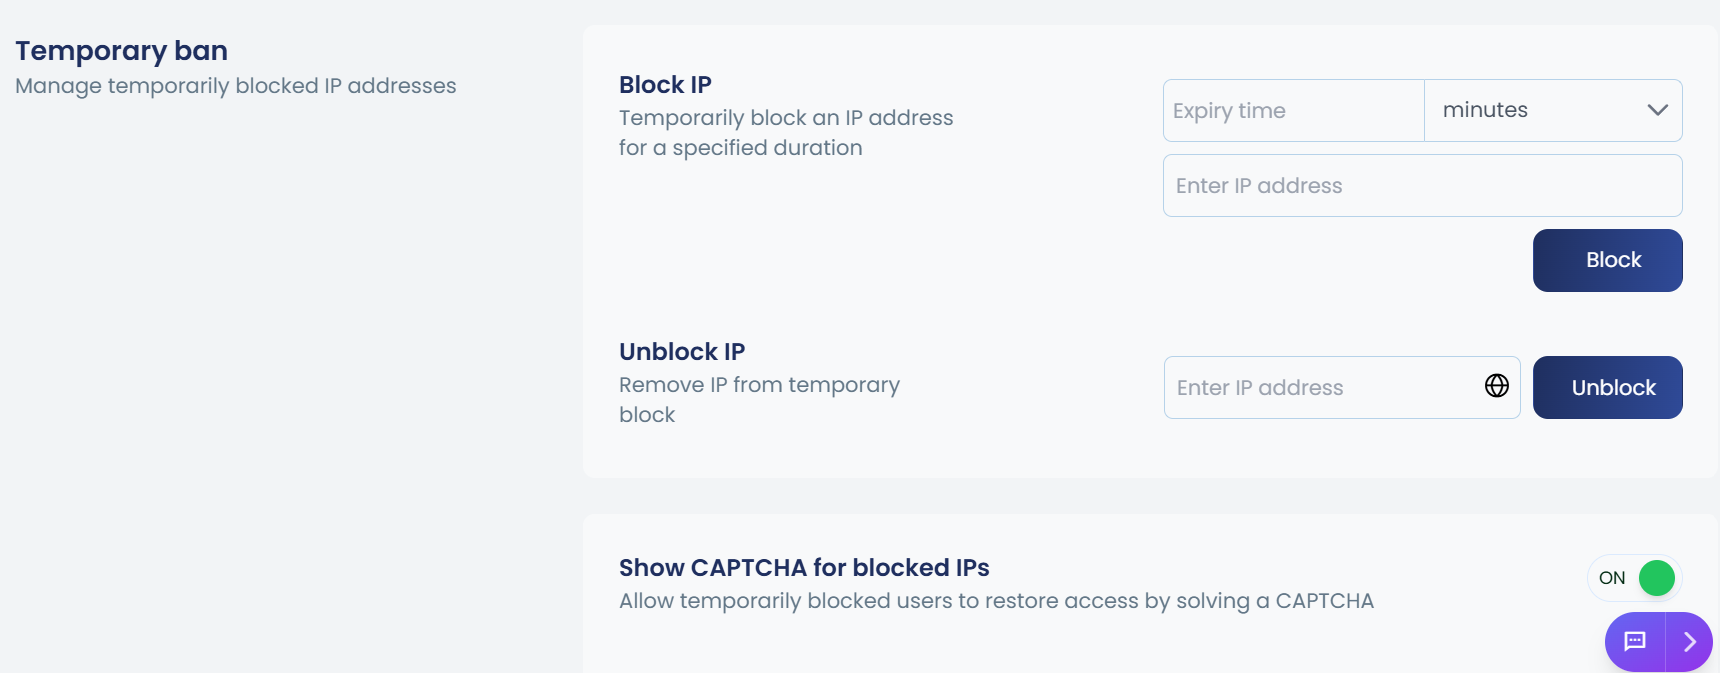
The cPGuard Firewall provides a Temporary Ban feature that allows you to temporarily block IP addresses for a specified duration. This is useful for managing suspicious or malicious traffic without permanently blacklisting an IP address. Temporarily banned IPs are automatically unblocked once the specified duration expires.
Managing Temporary Bans
Block an IP Address Temporarily
You can temporarily block an IP address from accessing the server using the cPGuard Portal or the CLI.
Using the cPGuard Portal
- Log in to the cPGuard App Portal
- Navigate to Protection >> Firewall >> Temporary Ban
- Enter the IP address you want to block in the Block IP input box
- Specify the duration for the block
- Click Block
Using the CLI
cpgcli ip --temp-ban <IP> --expiry <value> --reason 'comment'
Expiry values:
| Value | Description |
|---|---|
m | Minutes |
h | Hours |
d | Days |
Examples:
# Block an IP for 2 hours
cpgcli ip --temp-ban 192.168.1.100 --expiry 2h --reason 'Suspicious activity'

# Block an IP for 30 minutes
cpgcli ip --temp-ban 192.168.1.100 --expiry 30m --reason 'Brute force attempt'
If no expiry is specified, the default block duration is 24 hours.
Unblock a Temporarily Banned IP Address
Using the cPGuard Portal
- Navigate to Protection >> Firewall >> Temporary Ban
- Under the Unblock IP section, enter the IP address you want to unblock
- Click Unblock
The IP address will be immediately removed from the temporary ban list and the user will regain access to the server.
Using the CLI
cpgcli ip --temp-ban --remove <IP>
Example:
cpgcli ip --temp-ban --remove 192.168.1.100
List All Temporarily Banned IPs
To view all currently active temporary bans:
cpgcli ip --temp-ban --list
WAF Temporary ban
The WAF Temporary Ban feature enables cPGuard to automatically and temporarily block an IP address that triggers multiple WAF (Web Application Firewall) rules within a short period of time. This helps prevent automated attacks such as vulnerability scanners, brute-force attempts, and other malicious activities, while also reducing the overall burden on your server.
Managing WAF Temporary Ban Using the cPGuard Portal
- Log in to the cPGuard App Portal
- Navigate to Protection >> Firewall >> WAF Temporary Ban
- Toggle the feature On or Off as required
- Save the changes

Using the CLI
You can enable, disable, or check the status of the WAF Temporary Ban feature using the following command:
cpgcli fw --waf-ban enable|disable|status
Temporary allow
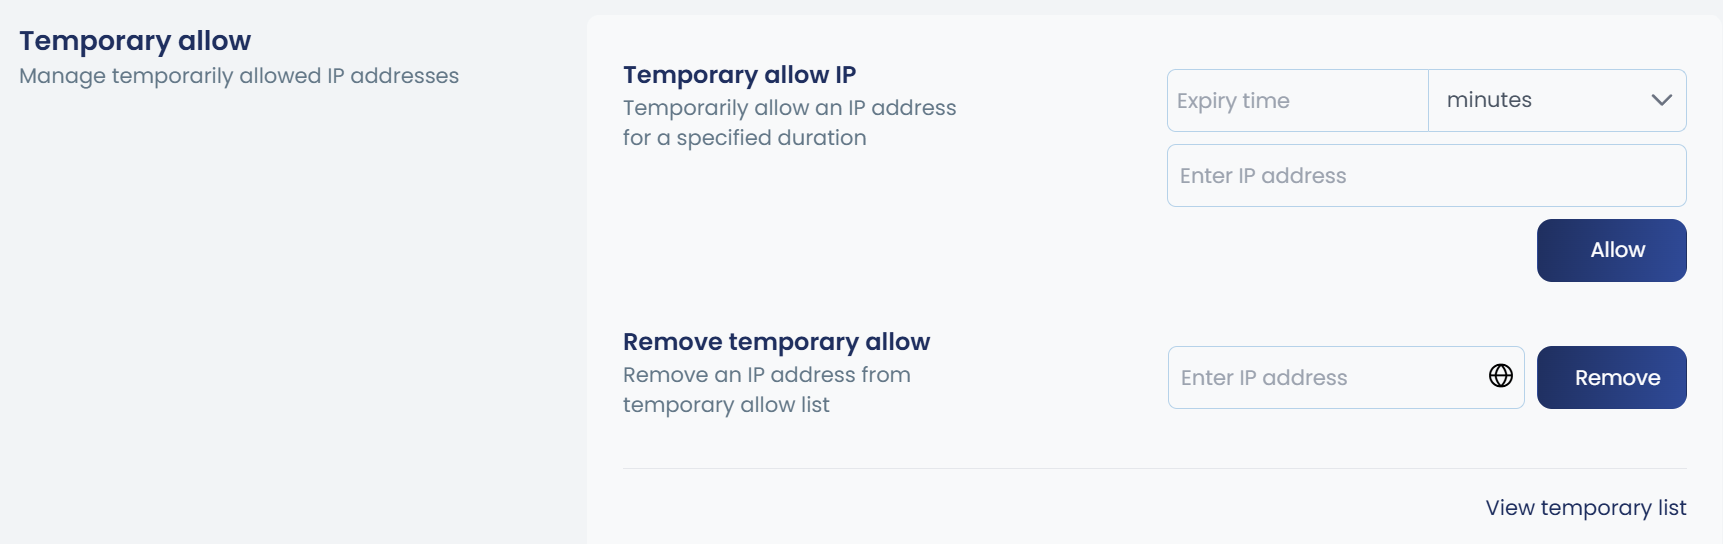
The Temporary Allow feature in cPGuard allows you to grant temporary access to a specific IP address for a defined duration. This is useful for situations where an IP address needs short-term access to the server without being permanently added to the whitelist. Once the specified duration expires, the IP address is automatically removed from the temporary allow list.
Temporarily Allow an IP Address Using the cPGuard Portal
- Log in to the cPGuard App Portal
- Navigate to Protection >> Firewall >> Temporary Allow
- Enter the IP address you want to allow in the Temporary Allow IP input box
- Specify the duration for the allow
- Click Allow
Using the CLI
cpgcli ip --temp-allow <IP> --expiry <value> --reason 'comment'
Expiry values:
| Value | Description |
|---|---|
m | Minutes |
h | Hours |
d | Days |
Examples:
# Allow an IP for 2 hours
cpgcli ip --temp-allow 192.168.1.100 --expiry 2h --reason 'Temporary vendor access'

# Allow an IP for 1 day
cpgcli ip --temp-allow 192.168.1.100 --expiry 1d --reason 'Scheduled maintenance'
If no expiry is specified, the default allow duration is 24 hours.
Remove an IP from the Temporary Allow List
- Navigate to Protection >> Firewall >> Temporary Allow
- Under the Remove Temporary Allow section, enter the IP address you want to remove
- Click Remove
The IP address will be immediately removed from the temporary allow list.
Using the CLI
cpgcli ip --temp-allow --remove <IP>
Example:
cpgcli ip --temp-allow --remove 192.168.1.100
View the Temporary Allow List
- Navigate to Protection >> Firewall >> Temporary Allow
- The currently active temporary allow entries are displayed in the Temporary Allow List table
Using the CLI
cpgcli ip --temp-allow --list
This will display all IP addresses currently in the temporary allow list along with their expiry details.
Use the Temporary Allow feature instead of permanently whitelisting an IP address whenever access is only required for a limited time. This ensures your server's security posture remains tight and access is automatically revoked once no longer needed.
Ignore IPs
The Ignore IPs feature in cPGuard allows you to exclude specific IP addresses or entire countries from firewall processing. Ignored IPs bypass firewall checks entirely, ensuring they are never blocked by any firewall rule, IPDB, or automated protection mechanism. This is particularly useful for trusted IP addresses or infrastructure that should always have unrestricted access to the server.
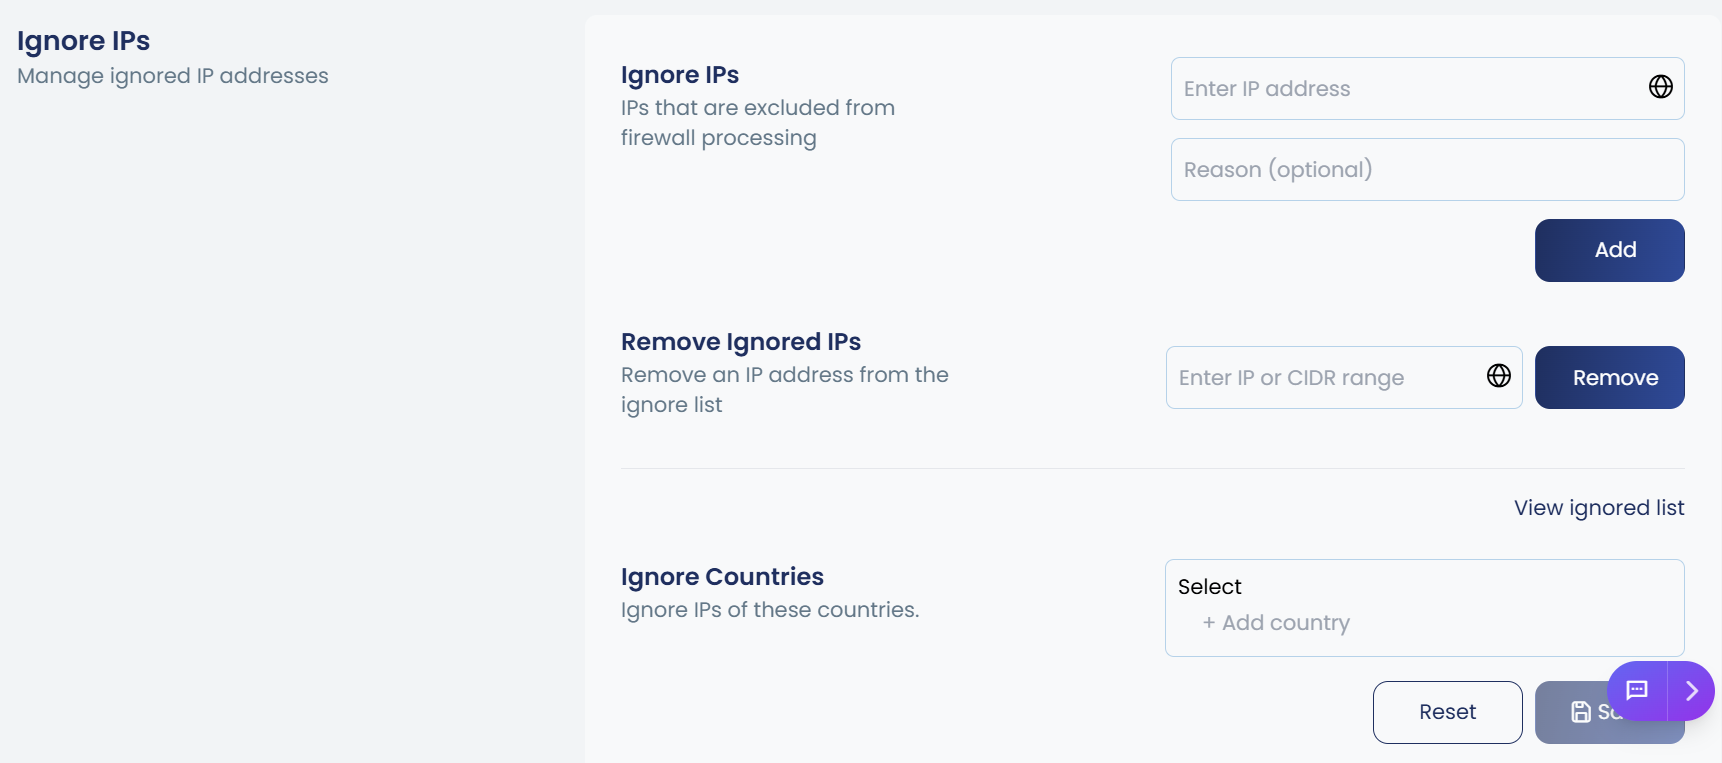
This is the recommended approach for ensuring trusted IPs are never blocked, especially for IPDB, rather than whitelisting the IP address directly.
Add an IP to the Ignore List
Using the cPGuard Portal
- Log in to the cPGuard App Portal
- Navigate to Protection >> Firewall >> Ignore IPs
- Enter the IP address or CIDR range you want to ignore in the Ignore IPs input box
- Click Add
Using the CLI
cpgcli ip --ignore <IP> --reason 'comment'
Example:
cpgcli ip --ignore 192.168.1.100 --reason 'Trusted office IP'
Remove an IP from the Ignore List
Using the cPGuard Portal
- Navigate to Protection >> Firewall >> Ignore IPs
- Under the Remove Ignored IPs section, enter the IP address you want to remove
- Click Remove
Using the CLI
cpgcli ip --ignore --remove <IP>
Example:
cpgcli ip --ignore --remove 192.168.1.100
View the Ignore List
Using the cPGuard Portal
- Navigate to Protection >> Firewall >> Ignore IPs
- The currently ignored IP addresses are displayed in the Ignored IPs list
Using the CLI
cpgcli ip --ignore --list
This will display all IP addresses and CIDR ranges currently in the ignore list.
Ignore Countries
cPGuard also allows you to ignore all IP addresses belonging to a specific country, excluding them entirely from firewall processing.
Using the cPGuard Portal
- Navigate to Protection >> Firewall >> Ignore IPs
- Under the Ignore Countries section, select the country or countries you want to ignore from the dropdown
- Click Save
To reset the country ignore list back to default, click Reset.
Ignoring an entire country will exclude all IP addresses from that country from firewall processing. Use this option with caution and only when you are confident that traffic from the selected country is trusted.
Using the CLI
cpgcli fw --ignore-country --reason 'comment'
Example:
cpgcli fw --ignore-country US --reason 'Trusted country'
Remove a Country from the Ignore List
Using the CLI
cpgcli fw --ignore-country --remove
Example:
cpgcli fw --ignore-country --remove US
View the Ignored Countries List
Using the CLI
cpgcli fw --ignore-country --list
For IPDB detailed documentation:IPDB
For DOS detailed documentation:DOS
AI Bots
The AI Bots feature in cPGuard provides firewall-level protection against malicious AI bot traffic. It works by collecting IP addresses of known AI bots based on reports generated from the Bad Crawler Protection WAF ruleset, and then blocking those IPs at the system firewall level.
How It Works
cPGuard's AI bot protection operates across two distinct layers:
| Layer | Component | Description |
|---|---|---|
| Layer 3 | Firewall | Blocks known AI bot IPs at the network level before traffic reaches your applications |
| Layer 7 | WAF | Detects and filters malicious bot traffic at the application level using Bad Crawler Protection rules |
The firewall module and the WAF work independently of each other. Known AI bot IPs identified through WAF's Bad Crawler Protection reports are fed into the firewall's IP blocklist, providing an additional low-level security layer that blocks malicious AI scrapers before they can even reach your web applications.
Enabling AI Bot Protection Using the cPGuard Portal

- Log in to the cPGuard App Portal
- Navigate to Protection >> Firewall >> AI Bots
- Switch the toggle to On to enable AI bot protection
- Save the changes
Using the CLI
# Enable AI Bot blocking
cpgcli fw --block-ai-bots enable

# Disable AI Bot blocking
cpgcli fw --block-ai-bots disable
Meta Bots Blocking
cPGuard also provides the ability to block Meta Bots specifically. Meta bot blocking works as an extension of the AI bot protection layer.
Meta Bots blocking requires AI Bots protection to be enabled first. Meta bot blocking will not function unless the AI Bots feature is already active. Ensure you have enabled AI Bots protection before enabling Meta Bots blocking.
Using the CLI
# Enable Meta Bot blocking
cpgcli fw --block-meta-bots enable

# Disable Meta Bot blocking
cpgcli fw --block-meta-bots disable
Country Filtering
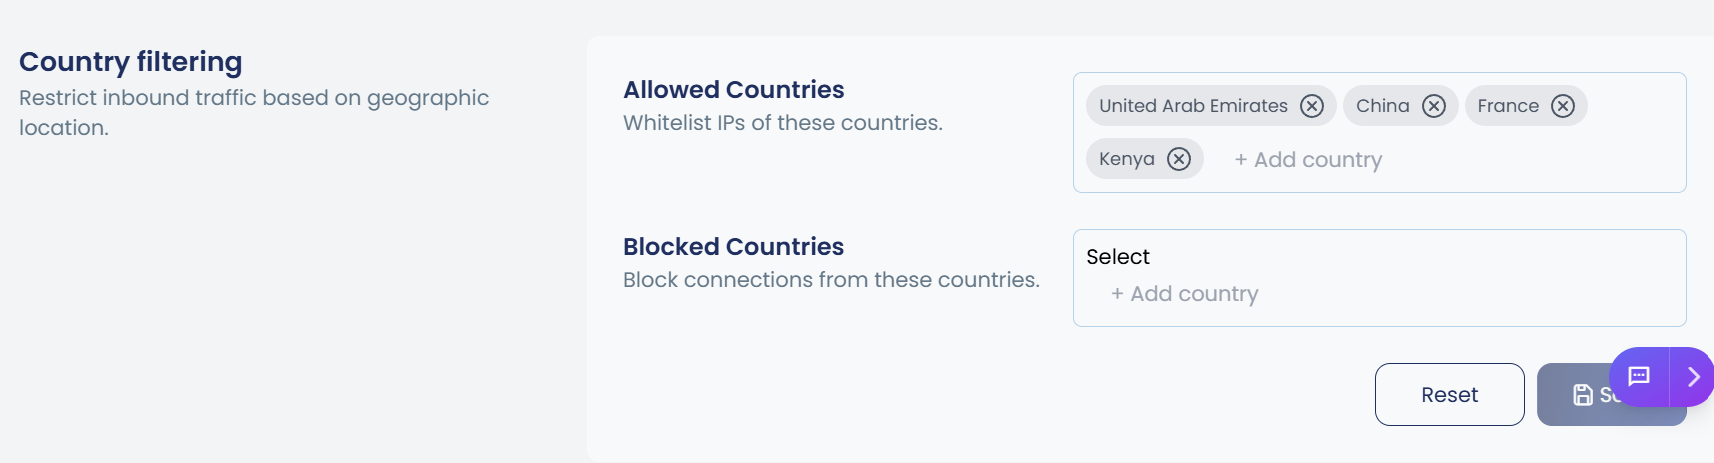
Country filtering allows you to control inbound traffic based on geographic origin. You can maintain two independent lists:
- Allowed Countries — Only connections from these countries are permitted (whitelist).
- Blocked Countries — Connections from these countries are explicitly denied (blacklist).
Allowed Countries (Whitelist)
| Command | Description |
|---|---|
cpgcli fw --allow-country <CODE> | Add a country to the whitelist |
cpgcli fw --allow-country --remove <CODE> | Remove a country from the whitelist |
cpgcli fw --allow-country --list | List all whitelisted countries |
Example — Add United Arab Emirates to the whitelist:
cpgcli fw --allow-country AE
Blocked Countries (Blacklist)
| Command | Description |
|---|---|
cpgcli fw --deny-country <CODE> | Add a country to the blacklist |
cpgcli fw --deny-country --remove <CODE> | Remove a country from the blacklist |
cpgcli fw --deny-country --list | List all blacklisted countries |
Example — Block connections from China:
cpgcli fw --deny-country CN
Port Filter Configuration
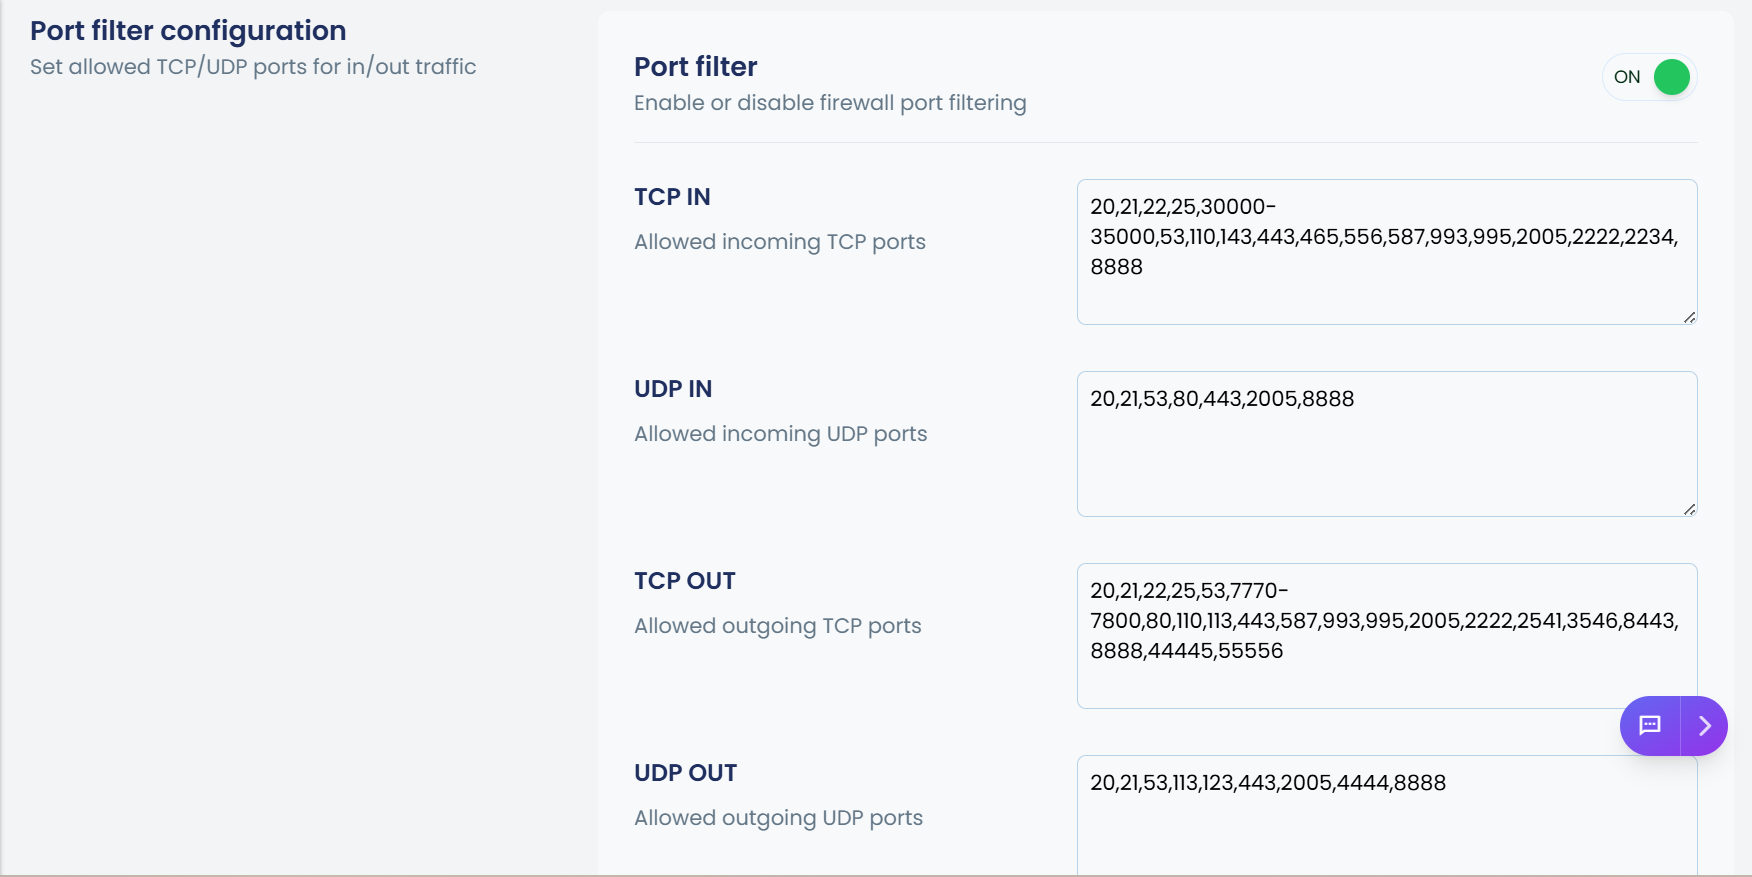
Port filtering controls inbound and outbound traffic by defining which TCP and UDP ports are permitted.
When port filtering is enabled, all TCP/UDP ports are blocked by default. Only ports explicitly added to the allowed list will be accessible. Enabling this feature without first configuring allowed ports may disrupt running services.
Enabling / Disabling Port Filtering
| Command | Description |
|---|---|
cpgcli fw --port-filter enable | Enable port filtering |
cpgcli fw --port-filter disable | Disable port filtering |
cpgcli fw --port-filter status | Check whether port filtering is active |
Managing Allowed Ports
Each traffic direction has its own allowed ports list. Use --add, --remove, or --list as the action.
| Command | Description |
|---|---|
cpgcli fw --port tcp-in <action> | Manage allowed inbound TCP ports |
cpgcli fw --port tcp-out <action> | Manage allowed outbound TCP ports |
cpgcli fw --port udp-in <action> | Manage allowed inbound UDP ports |
cpgcli fw --port udp-out <action> | Manage allowed outbound UDP ports |
Available actions:
| Action | Syntax | Description |
|---|---|---|
--list | --list | List currently allowed ports |
--add | --add <port> | Add a port or range to the allowed list |
--remove | --remove <port> | Remove a port or range from the allowed list |
Port Range Syntax
You can specify individual ports, ranges, or a combination of both:
| Format | Example | Meaning |
|---|---|---|
| Single port | 22 | Port 22 only |
| Port range | 30000-35000 | All ports from 30000 to 35000 |
| Mixed | 22,80,443,30000-35000 | Ports 22, 80, 443, and 30000–35000 |
Example — Allow inbound TCP on ports 22, 80, 443, and a custom range:
cpgcli fw --port tcp-in --add 22,80,443,30000-35000
Example — Remove port 80 from outbound TCP:
cpgcli fw --port tcp-out --remove 80
Example — List allowed inbound UDP ports:
cpgcli fw --port udp-in --list
Dynamic DNS (DDNS)
Dynamic DNS (DDNS) automatically updates the DNS record associated with a domain name whenever your public IP address changes. This is commonly used for networks or devices with dynamic IP addresses (e.g., home broadband connections, cloud instances without static IPs), ensuring that your domain name always resolves to the correct address.
If you add myhome.example.com as a DDNS entry and it currently resolves to 203.0.113.42, that IP is automatically whitelisted. When your IP changes to 203.0.113.99, the whitelist is updated to reflect the new address.
DDNS Commands
| Command | Description |
|---|---|
cpgcli ip --ddns --list | List all configured DDNS entries |
cpgcli ip --ddns <name> | Add a new DDNS entry for the specified hostname |
cpgcli ip --ddns --remove <name> | Remove a DDNS entry |
Example — Add a DDNS entry for myhome.example.com:
cpgcli ip --ddns myhome.example.com
Example — Remove an existing DDNS entry:
cpgcli ip --ddns --remove myhome.example.com
Example — View all current DDNS entries:
cpgcli ip --ddns --list