Deploy a Website with Node.js
cPGuardX provides built-in support for deploying and managing Node.js applications directly from the control panel. Users can enable Node.js for a domain and deploy applications without manually configuring the Node.js runtime, process manager, or reverse proxy.
Deployment Methods
Node.js applications can be deployed in two ways:
| Method | Description |
|---|---|
| During new website creation | Select Node.js (Beta) as the application type and deploy the application as part of the website setup. |
| For an existing website | Go to Website Management → Tools → Applications and deploy a Node.js application to the website. |
Deploying a Node.js Application
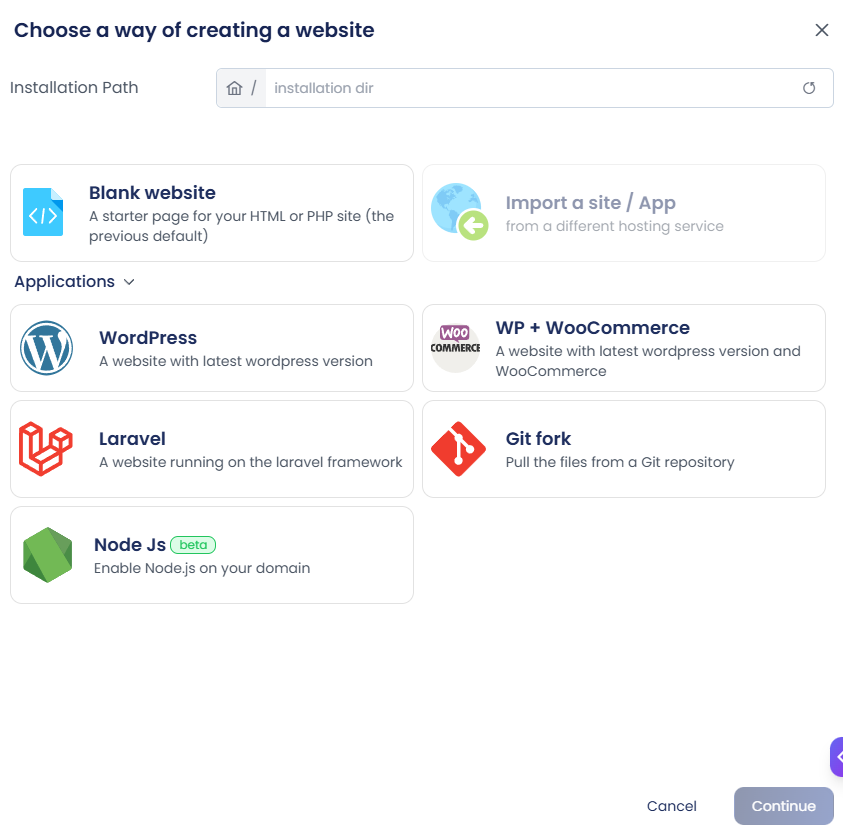
When creating a new website, select Node.js (Beta) as the application type and continue with the website setup. You can then choose the application source:
- Starter App – Create a new cPGuardX-managed Node.js application.
- Git Repository – Deploy an application from a remote Git repository.
1. Deploying from a Starter App
Select Starter App to create a new Node.js application managed by cPGuardX, then configure the following options.
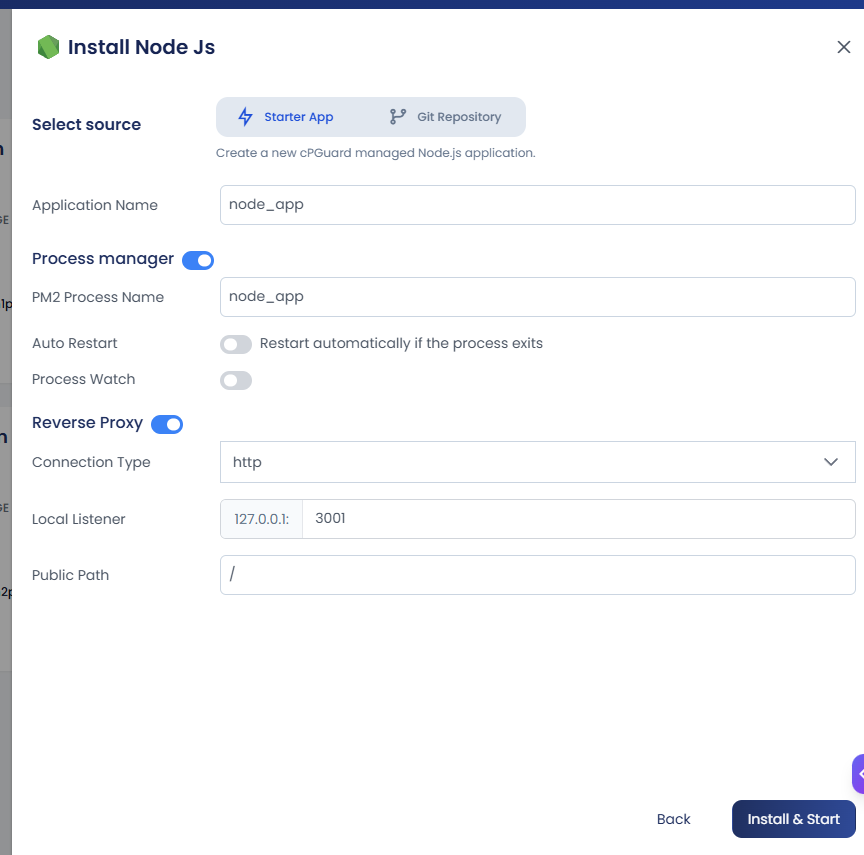
The details for Application name, Process Manager, and Reverse proxy rules are filled in automatically. If you want to change any of them, you can edit the values. Otherwise, click Install and Start.
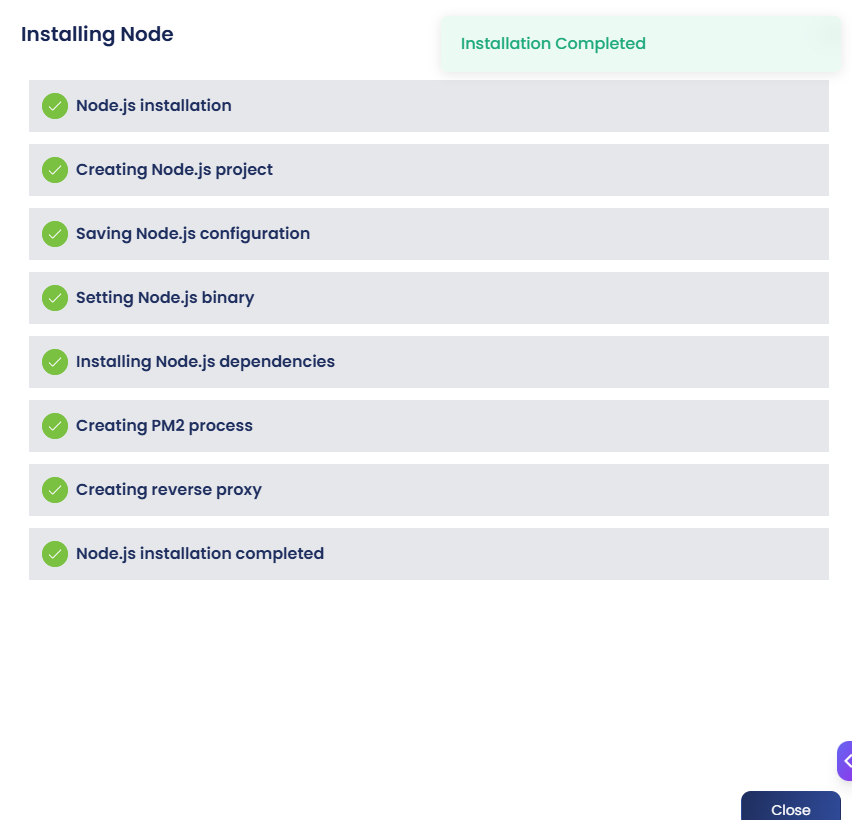
cPGuardX displays the deployment progress while the application is being installed. Once the process is complete, a confirmation message is displayed and the application is added to the list of deployed applications.
2. Deploying from a Git Repository
When creating a Node.js application, select Git Repository as the application source and configure the following.
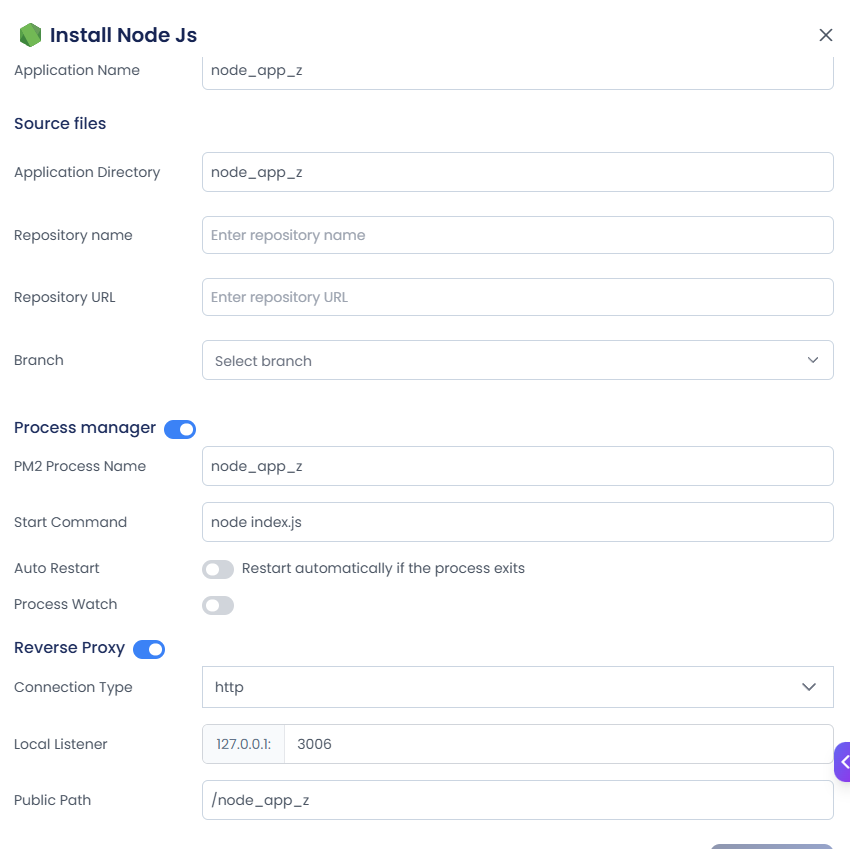
Enter the repository details:
- Repository Name – The name of the repository.
- Repository URL – The remote URL of the Git repository.
- Branch – Select the branch to deploy from the drop-down list.
- Start Command – The command used to start the application. It is detected automatically from the application's entry file and loaded into the field, for example
node index.js,node app.js, ornode server.js, depending on how the application is set up.
After entering the repository details, click Install and Start.
Once the process is complete, a confirmation message is displayed and the application is added to the Applications list.
Managing a Node.js Application
After deployment, installed applications are listed under the Applications section. Click Manage next to an application to open its management interface.
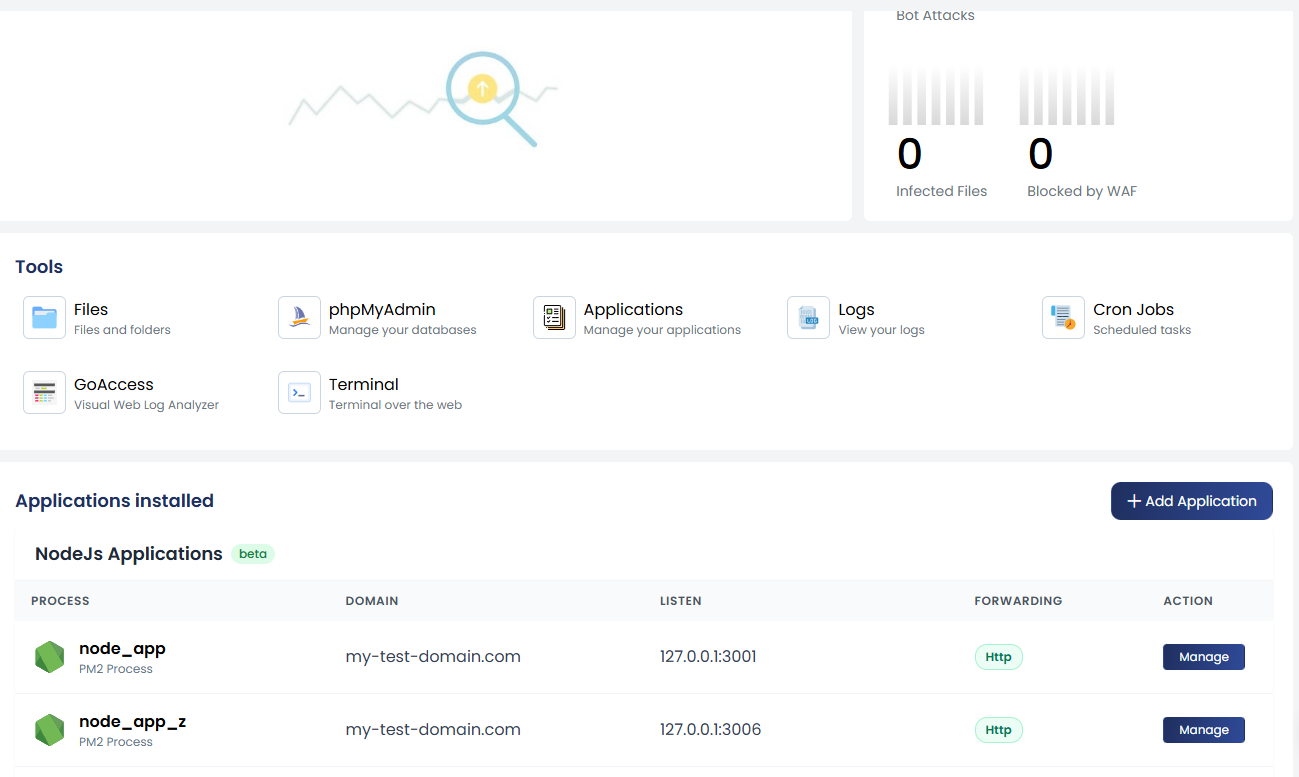
The Manage page displays a summary of the deployed Node.js application, including:
- Application Path – The filesystem path where the Node.js application is located.
- Runtime Stack – The Node.js and NPM versions used by the application.
- Git Repository – Shows whether the application is connected to a Git repository.
The following action buttons are also available at the top of the page:
- Deploy – Deploys the application using the saved deployment configuration.
- Terminal – Opens a terminal so you can access the application's directory and run commands directly from the control panel.
The Deploy button on the application's management page works only after the deployment configuration has been set up and saved.
The Git Repository field displays different values depending on how the application was deployed:
- Starter App – The field displays Not connected.
- Git Repository – The field displays the connected repository URL.
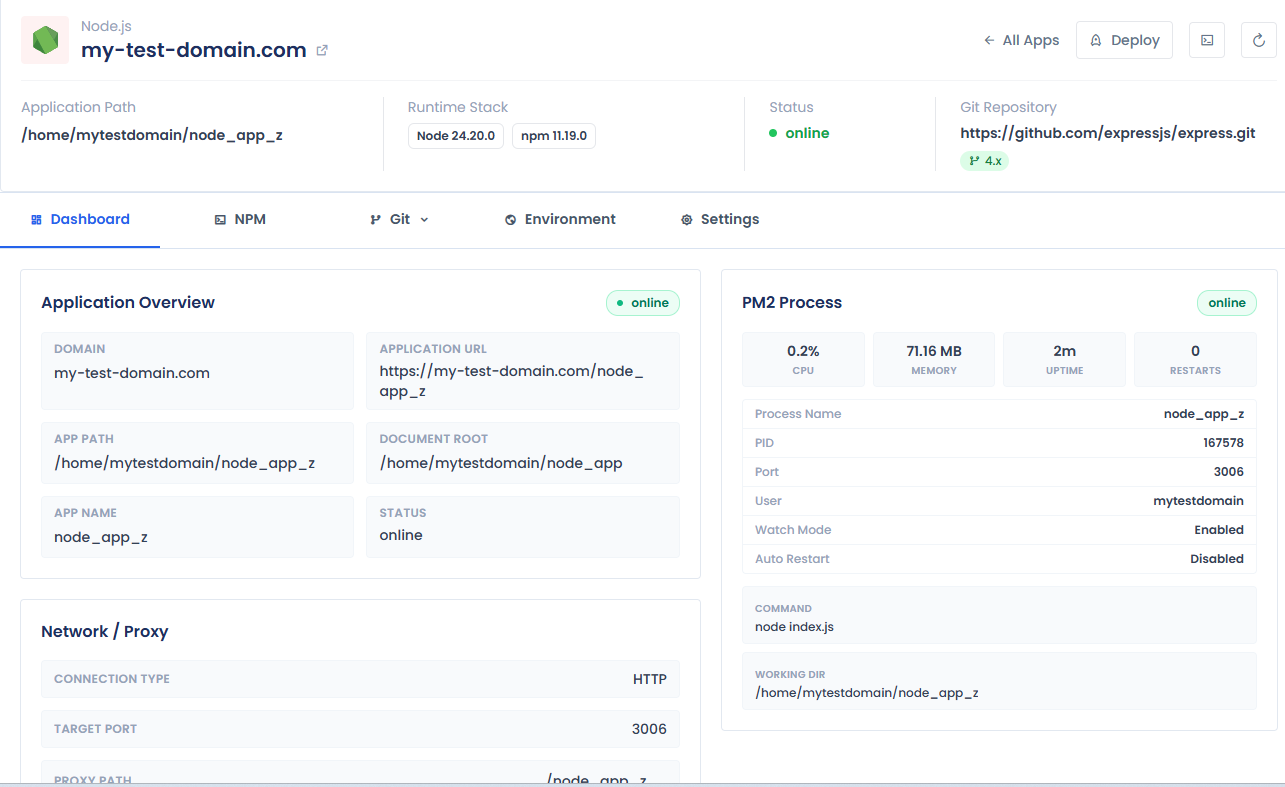
The management interface provides the following sections:
| Section | Description |
|---|---|
| Dashboard | Runtime overview, proxy details, and PM2 process status. |
| NPM | Package management tools. |
| Environment | Environment variable configuration. |
| Settings | Process, forwarding, and deployment configuration. |
| Git | Repository and deployment management. Available only for applications deployed from a Git repository. |
Applications deployed from a Git repository include an additional Git tab in the management interface.
Dashboard
The Dashboard provides an overview of the Node.js application and its current runtime status.
Application Overview
The Application Overview displays the key details of the deployed application, including the domain it is attached to, the public application URL, the application path, the document root of the website, the application name, its current status, and the runtime stack in use.
Network / Proxy
The Network / Proxy section shows how incoming requests are routed to the application. It displays the configured connection type, the target port the proxy forwards to, the proxy path, and the current proxy status.
PM2 Process
The PM2 Process section provides a detailed view of the running application process. It displays the process status, CPU and memory usage, uptime, restart count, process name, process ID (PID), port, website user, watch mode, auto restart status, start command, and working directory. Together, these details allow you to monitor the Node.js process and verify that the application is running correctly.
NPM
The NPM section provides package management tools for the application.
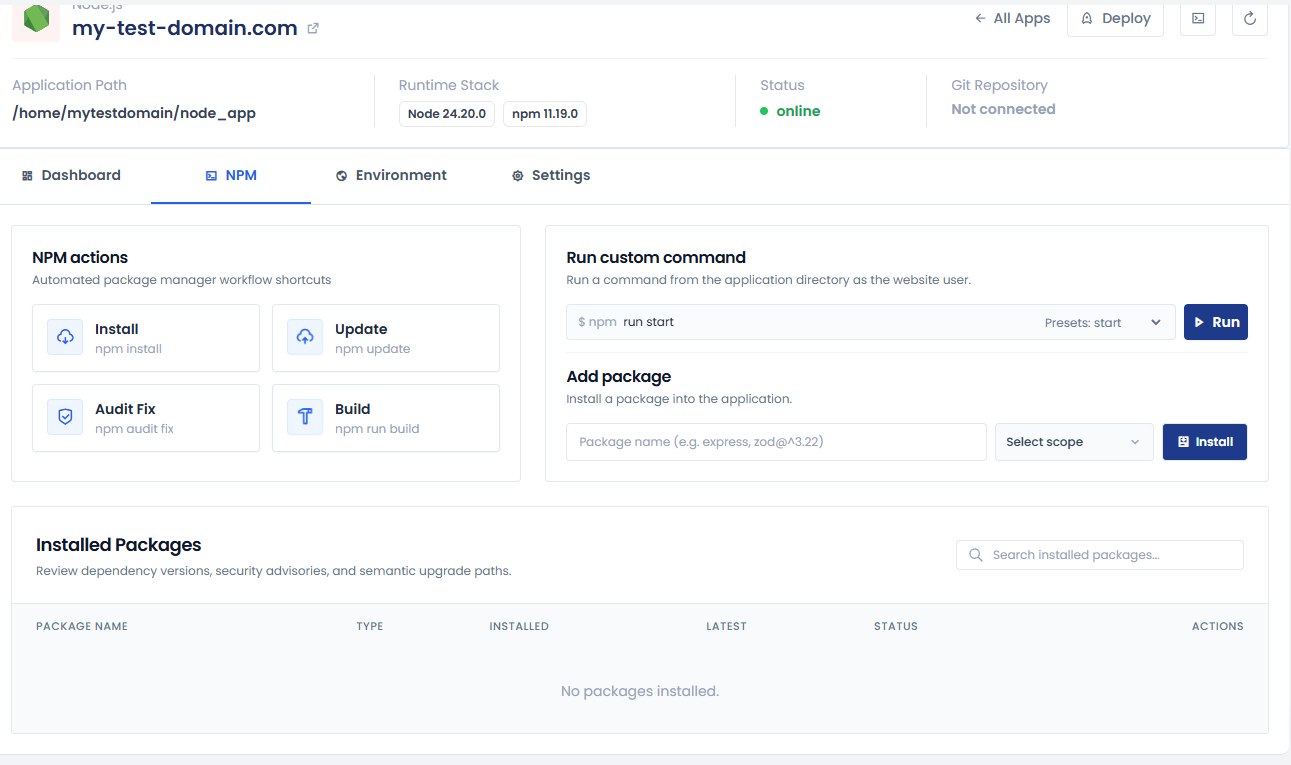
NPM Actions
Common NPM operations can be run directly from the control panel with just one click. The available actions are Install, Update, Audit Fix, and Build.
Run Custom Command
You can run any NPM command from the application directory as the website user. For convenience, the interface provides presets for commonly used commands, including Start, Dev, Test, Build, and Lint.
Add Package
You can install additional packages into the application and choose the installation scope that suits your needs. Production installs the package as a runtime dependency using --save, Development installs it as a development dependency using --save-dev, and Global installs it globally using --global.
Installed Packages
The Installed Packages section lets you review the application's dependencies.
Environment
The Environment section allows users to configure environment variables used by the Node.js application.
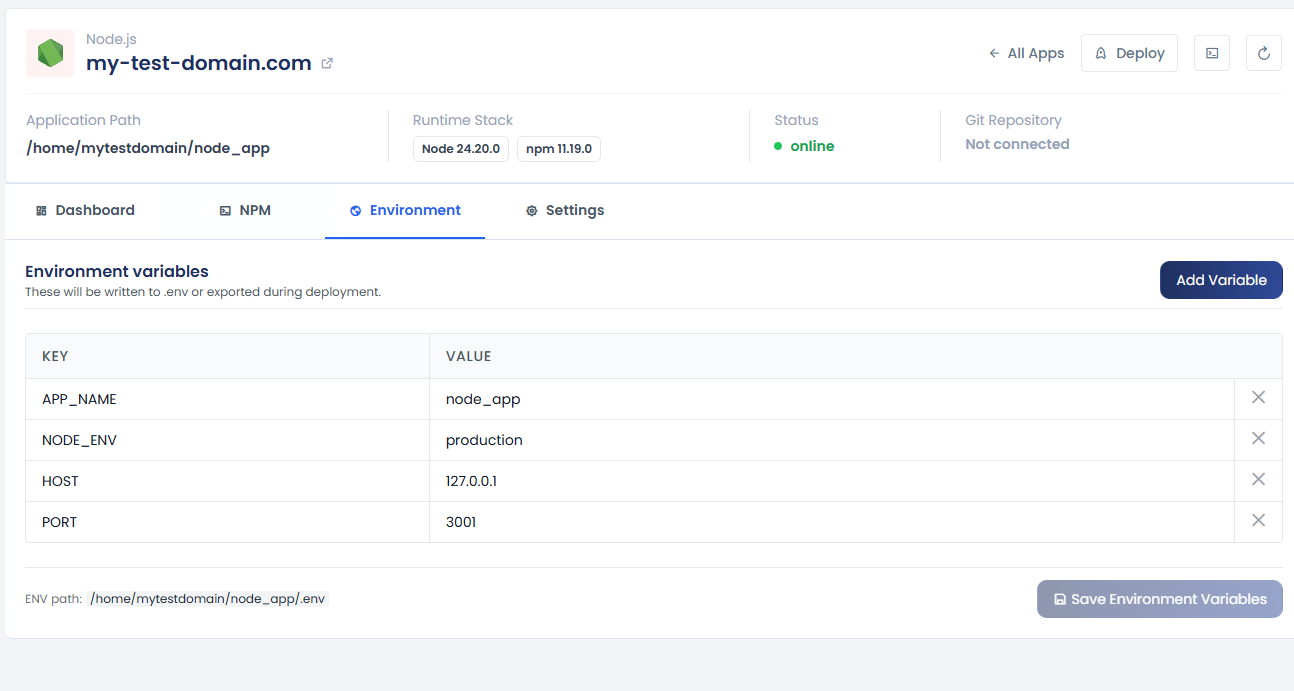
Each variable is defined by:
- KEY
- VALUE
These variables are written to the application's .env file or exported during deployment. For example, the environment file may be located at:
/home/mytestdomain/node_app/.env
Click Save Environment Variables after adding or modifying variables.
Settings
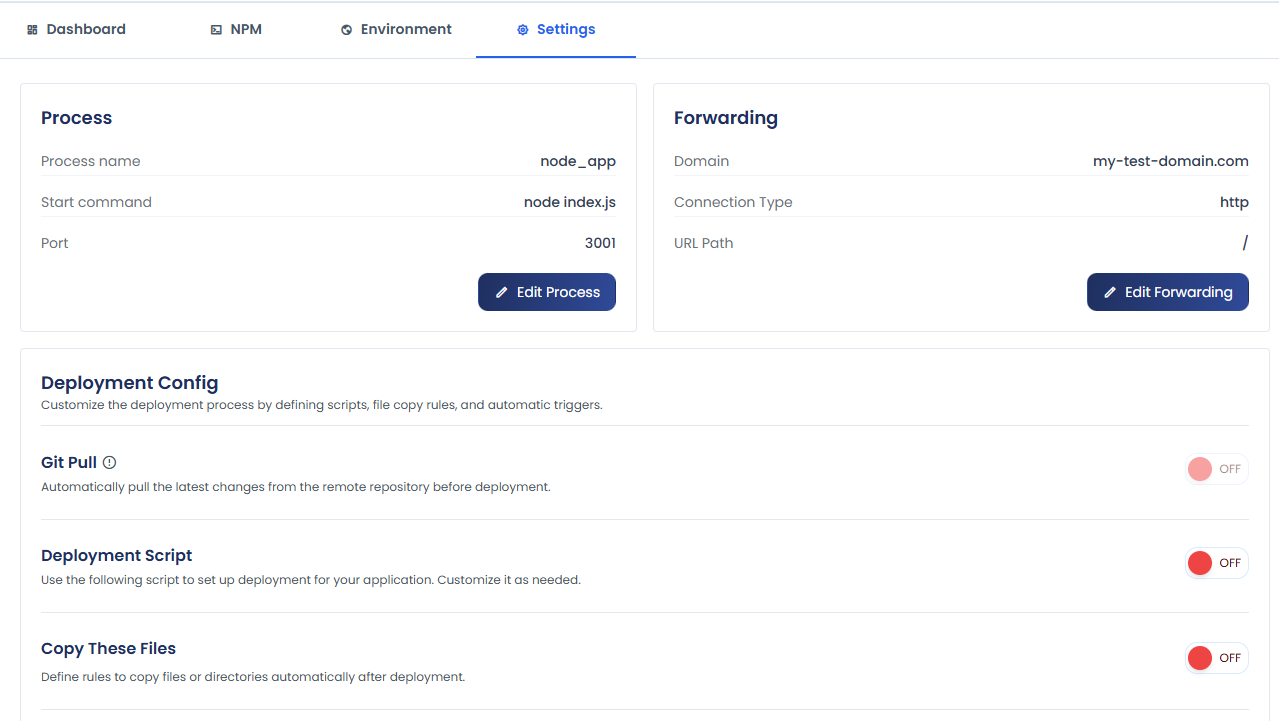
The Settings section allows users to modify the application's process, forwarding, deployment configuration and delete application.
Process
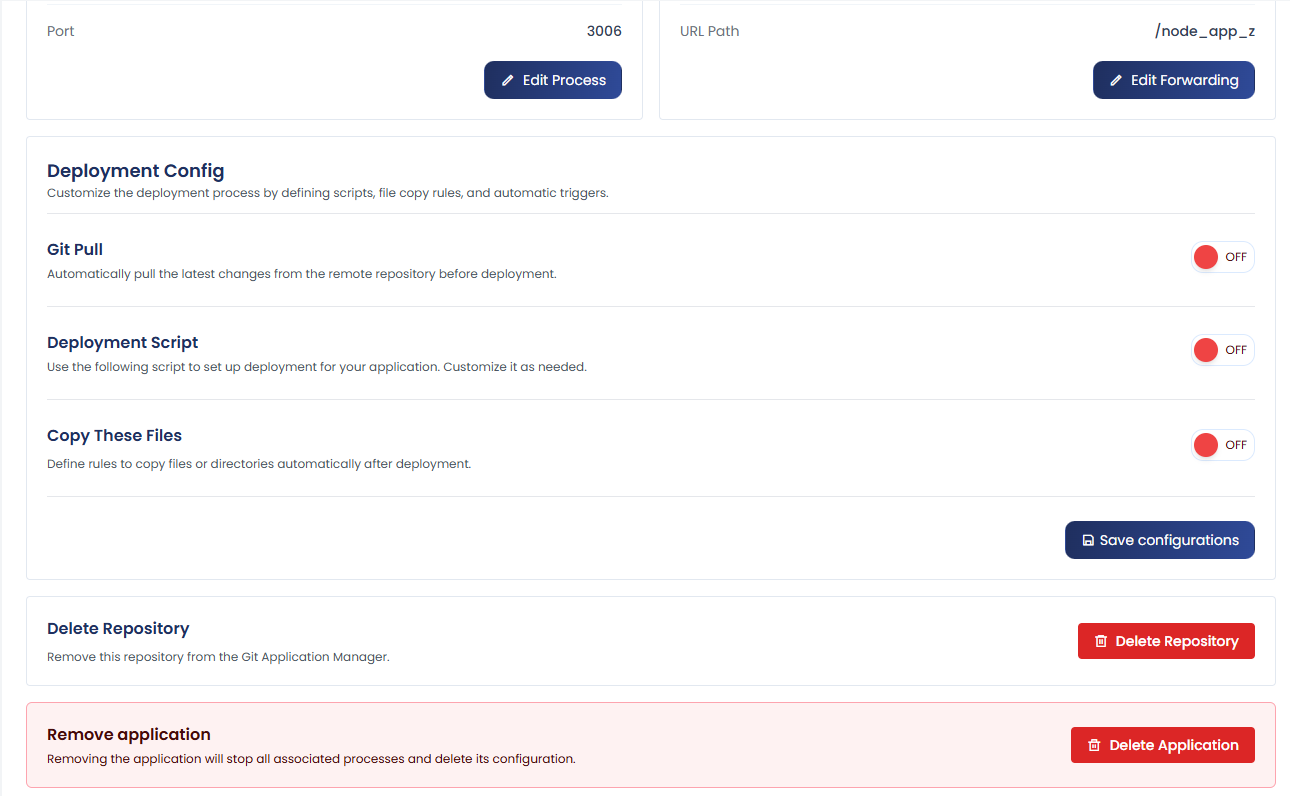
The Process card shows the PM2 process name, the start command, and the port the application runs on. Click Edit Process to change these values.
Forwarding
The Forwarding card shows the domain, connection type, and URL path used to forward requests to the application. Click Edit Forwarding to change these values.
Deployment Config
Use the Deployment Config section to customize the deployment process with Git Pull, Deployment Script, and Copy These Files. Enable the options you need, then click Save configurations to apply them.
Initialize Git Repository
If the application is not connected to a Git repository, click Initialize Repository to start tracking changes and managing deployments.
Remove Application
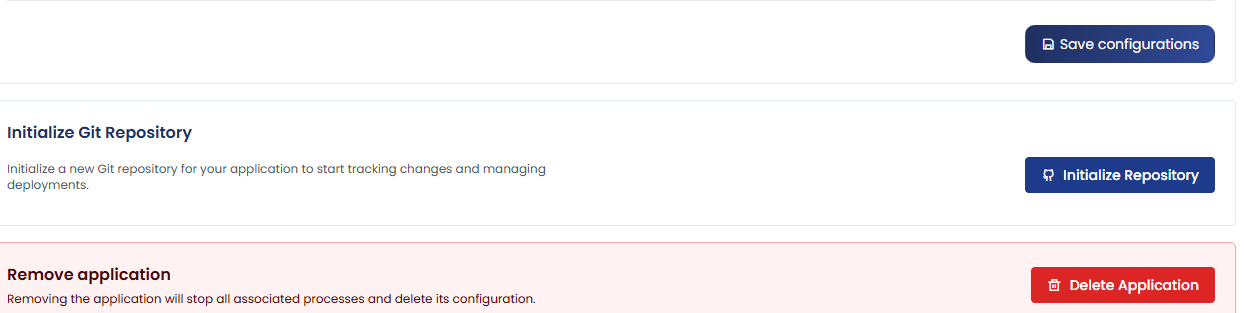
Click Delete Application to remove the application. This stops all associated processes and deletes the application's configuration.
This action cannot be undone.
Git
The Git section is available only for applications deployed from a Git repository.
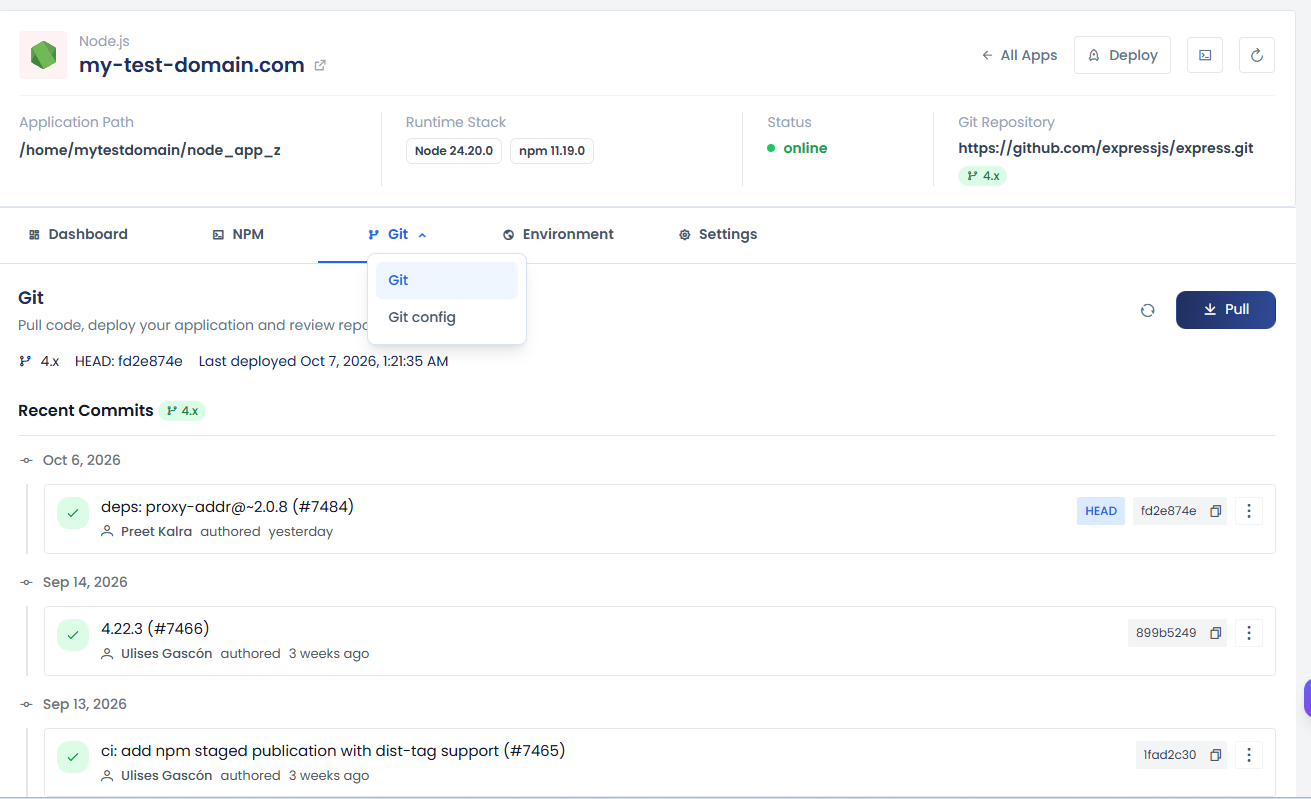
The Git section allows users to manage the application's Git repository and deployment activity. Users can:
- Pull the latest code from the repository.
- Deploy the application.
- Review repository activity.
- View the current HEAD commit.
- View the last deployment time.
Git Configuration
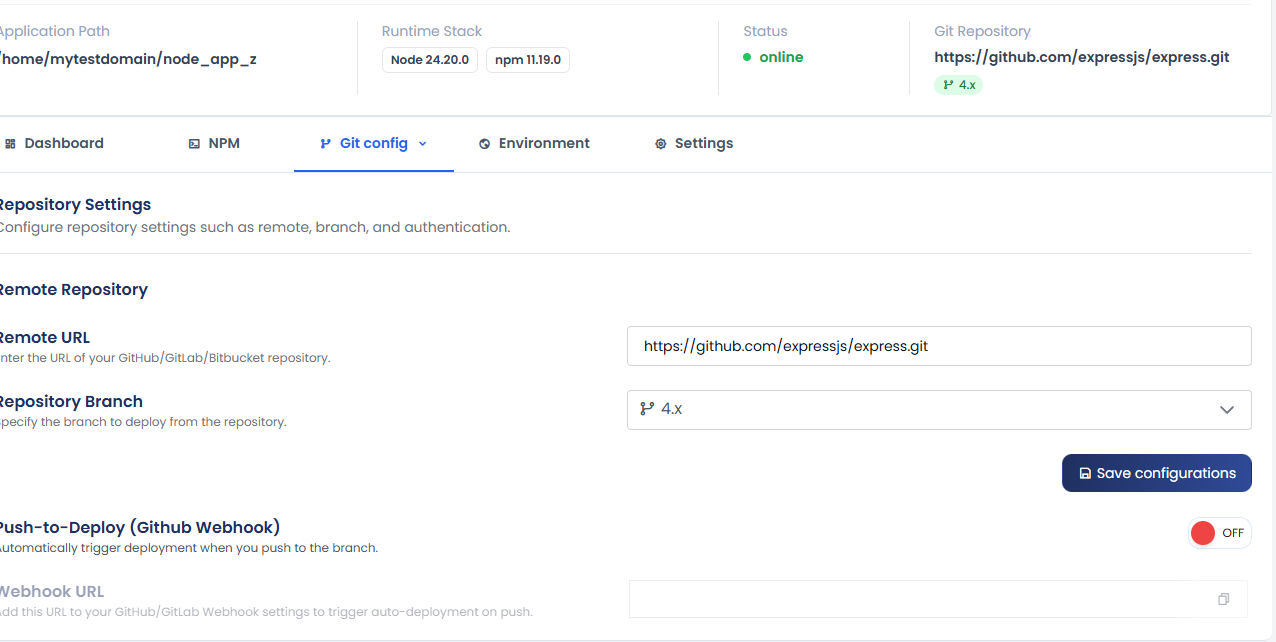
The Git Config section allows users to configure the application's remote repository.
| Option | Description |
|---|---|
| Remote URL | The URL of the GitHub, GitLab, or Bitbucket repository. |
| Repository Branch | The branch to deploy from. |
Click Save Configurations to save the repository settings.
Push-to-Deploy
The Push-to-Deploy feature triggers deployments automatically when changes are pushed to the configured repository branch.
To set it up:
- Enable Push-to-Deploy.
- Copy the generated Webhook URL.
- Add the URL to the webhook settings of the corresponding GitHub, GitLab, or Bitbucket repository.
When a push is received through the configured webhook, cPGuardX automatically triggers the application deployment.
Delete Repository
Remove this repository from the Git Application Manager.